Anyway I decided to do another design of the enclosure one without the battery for those that just want to connect to their laptop via the USB cable and us the PC software from elsewhere in my blog.
This design is a bit smaller that the first as there is no battery, switch or charging cable, I did leave in the holder for the Bluetooth module so it can be used with the smartphone app but you will need to power it from one of those portable emergency batteries via a USB cable.
You can get the STL files from Thingiverse


I've also been making some changes to the Arduino sketch to improve the functionality, I've implemented the use of interrupts to trigger the measurements so that some other things can be done via the main loop like checking if the trigger beams are blocked.
Some other options may be possible like adding and SD card to store shot data internally and use you PC later to recover the shot data for analysis, If you use a long enough piece of aluminium you could add a thread to the end to fit you silencer to and just use you gun for the day and download the shot data later.


7 comments:
great project I want to try building myself are you still using resistors on the led sensor and emitters ?
John,
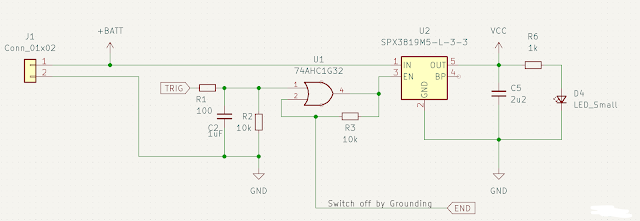
There are two 150 Ohm resistors in series with the LED emitters to limit the current but no resistors for the detectors as they run off 5V and have an open collector digital output triggered when the beam is broken.
There is a fritzing drawing on the blog and I just realised I left out the resistors DOH!
Thanks I dont know why I said the detectors that was a little brain fart I knew they wouldn't have them.
Another question do you know how far apart the sensor array will work I know you used 16mm Dia tube but most moderators are bigger about 25mm Dia, I am thinking of putting this in to a working moderator with a connector between the array and the Arduino but there are a few ways it could be done.
on your latest blog you dont mention how you are charging the battery do you run a charging board with it or remove for charging
and..
the voltage regulator is not so readily available anymore as far as I can see there is an alternative I think would work namely ebay.co.uk/itm/221976528609 would this be ok
Thanks again
John
John,
The distance is a good question, I've got them about 15mm apart in another version and it works OK, one key thing I think is important is the wall thickness, I feel this helps to create a sweet spot for the detector being at the bottom of a shallow tube, it also shade it from ambient light. Getting the holes right on the centreline of the tube is important.
I have to admit I have thought about including it in a silencer but it's a lot to fit in a small space.
I charge the battery using the connect sticking out with a USB to lithium charger module.
That 3 to 5V converter looks OK if a little big, I'll see if there's room to fit one.
John,
I've just ordered some of the 5V converters fro Proto pic, they didn't have much stock but state they can get more in 3 to 5 days so you should be OK to et one.
Thanks Gadjet
I think I have found a smaller one
http://www.ebay.co.uk/itm/361545072589
I have figured out a way of fitting the sensor array inside a moderator I just need to track someone down with a mill to make it
Nice one! Cheaper as well.
I should have spent more time looking DOH!
Great, I only have a lathe and 3D printer but please let me know how you get on, start your own blog maybe?
Post a Comment